toiletries

All posts in the toiletries category

My homemade skincare/ hair care aloe vera lotion: a how-to guide with step-by-step pictures:

Published May 14, 2016 by AntiqueMystique1

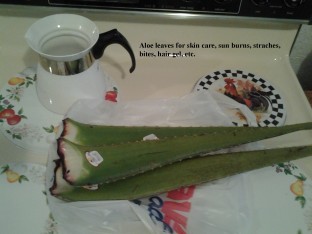
It will cost about a dollar or less for the aloe vera leaves depending on your geographical location, and if your supermarket stocks these huge leaves since they might likely be considered a ‘specialty’ item and hard to find/ purchase. I know before we got a new grocery store, I had no idea aloe vera leaves were sold fresh much less grown for their edible purposes as well. In fact, I had never seen a large aloe vera leaf in person until I popped into the new grocer to see what all the hubbub was about. And what I found was some very new and somewhat exotic edibles such as aloe vera and cactus leaves (when boiled cactus leaves are very similar to green beans and freeze well, too) which I’ll blog about here in a little bit in a separate post.


Before I spent any money on the aloe vera leaves, I did my research. I scoured youtube to see what others had to say about fresh aloe vera leaves. It turns out I learned of the many benefits of aloe vera and cactus leaves. I had seen whole cactus leaves being sold at some other grocers between $5-7 dollars and you only received two small cactus leaves that you had to then go to the trouble to de-thorn, slice, chop—essentially ‘prep’ the old-fashioned way. I watched several youtube videos on how to cut up a cactus leaf and the thorns fly everywhere even when using a plastic bag and scrapping them with a paring knife. Sounded like a potential whacking off a digit accident waiting to happen.


I did more research late at night while waiting for my [then working] off-balance washing machine to finish thrashing another load of laundry. After watching about ten ‘how to’ cut aloe vera leaves and boil cactus leaves youtube videos I decided to give both the aloe vera and cactus leaves a try.


Are the aloe vera leaves edible? Yes, the gooey clear gel is edible. However, if the slime is yellow this will act as nature’s laxative and it’s highly recommended to discard the yellow stuff. In small quantities the aloe vera leaf gel can be blended into smoothies, chopped up and frozen for later use for skin application and/or used in DIY olive, coconut, and argan oil hair mask treatments. I even found a use for the aloe vera leaf itself and like to cut it up, bag, label and freeze them for later use when dry shaving my legs or whenever I might need something quick and handy for rubbing on my skin or through my hair to make it soft. I usually run on a very erratic schedule, so yes, there’s going to be prep work involved which should take about 30-35 minutes and you’ll have to set aside time to cut the aloe vera leaves. I find that I can make this aloe vera gel last me about a month (conserving it that is) and stretching it with some steam-treated distilled water. Never use city tap water as that can contain bacteria and other nasties that can’t be filtered out in a city water treatment facility try as they might, plus if the city fluoridates their water or its hard water that’s really yucky!


“Make sure it’s steam-treated [distilled water], not the other kind,” That was sound advice from my dear dad a year ago. He’s been a health nut long before I was ever born.


Here’s the steps I use for making my homemade aloe vera lotion. Oh, and this must be kept in the fridge or else it will go rancid if sitting out since there’s no preservatives whatsoever when I make my aloe vera lotion.

aloe leaves for hair care

Step one: Wash the aloe vera leaf with some distilled water (never tap water) to give it a quick rinse. Drying the aloe vera leaf isn’t necessary unless you want to do this extra step.

aloe vera step2

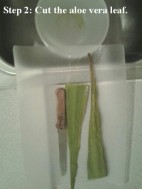
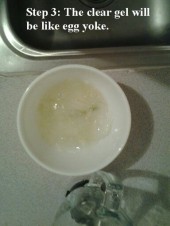
Step two: Make sure you have a bowl or other container ready. I find that placing a bowl in the kitchen sink helps and I just scrape the gooey goodness into it from the cutting board. Use a serrated knife and a cutting board as well. Also, be extremely careful when slicing these aloe vera leaves. The gooey stuff is slimy and will be the consistency of egg yoke and it gets over everything and makes work surfaces and the knife you’re using very slippery. So, do exercise caution when cutting the aloe vera leaves with a sharp knife and take your time.

aloe vera step 3

Step three: I like to cut off the tip and end and discard those in my compost container that I plan to empty into my garden. Next, I slice downward to remove the prickly thorny sides of the aloe vera leaf. Sometimes they’ll yield a very tiny amount of clear gooey stuff and I’ll cut those into slices and place them in my freezer bag for later use. When I can help it I don’t like to discard a lot of stuff until I get as much use from it as humanly possible.

aloe vera step 4

Step four: Transfer the clear gooey stuff from the bowl and pour it into the blender. Blenders will vary and I like to start blending with the ice crushing option, then whip and puree. At this point the clear aloe vera gel should turn frothy and foamy. This is normal and the foam will settle. To make this stretch further I also pour in about half a cup of distilled water and blend it some more. Again, this will turn foamy and it will settle. I then make sure my aloe vera jar is handy and fill it. After screwing the cap on it I like to give the contents a good shake then place it in the fridge.


Shelf life of my homemade aloe vera lotion is about one week in the fridge. However, I’ve been able to make my aloe vera lotion last for about two weeks even a month if I’m conservative with it and haven’t noticed it going rancid in the fridge. And always whenever I remember I will pick up one or two aloe vera leaves and store them in my fridge until I need one this way I have a constant stock of them on hand. And look for the discounts. Sometime aloe vera leaves will be sold by the red tape bundle at a discount if they’re wilted. This I’ve discovered doesn’t matter much to me since I don’t use the wilted aloe vera leaves for smoothies. I use the wilted aloe vera leaves for my skin and hair care lotions. I use the good aloe vera leaves for the smoothies which I seldom make except once-in-a-while due to their cleansing/ detoxing properties.

aloe vera step 5

Step five: pour the aloe vera lotion in a glass jar. I have heard that plastic containers can leach out chemicals into food and drinks so I re-use a 10 ounce glass green olive jar for my homemade aloe vera lotion (pictured).


Hope this how-to tutorial helps for my fresh homemade aloe vera lotion. I never use any preservatives when making this. When it settles it will feel like a raw egg when applying it to the hair and skin. But no need to panic, the skin absorbs the aloe vera gel rather fast and leaves your skin feeling velvety smooth. Sometimes there might be some gel sediment that adheres to the skin and hair. I use a soft-bristle natural foot brush to whisk this from my skin and hair. When applied to the hair (a little bit goes a long way), wrap your hair in a silk or cotton scarf or any soft large light-weight material will do and keep it on for an hour, then remove the scarf and gently comb your fingers through your dry hair. Doing this step after you’ve washed and towel-dried your hair works great and makes your hair feel extremely soft and gives it some shine. I found this to be a huge relief since my area is hard water. And since I quit exposing my hair to all the fluoridated city water recently, I noticed my hair is not as limp, weighed down, greasy or unhealthy or ‘unwashed’ in appearance. Also, I don’t wash my hair daily into overkill like I once used to do years ago and saturate my poor hair strands to chemically-laden shampoos and conditioners (whatever was cheap at one time). I also re-use my fresh fruit/ fresh veggie distilled rinse water and make my own Camomile sun tea on occasion to give some high lights to my hair. Other times I keep a large pickle jar in the fridge filled with part distilled and bottled drinking water (supposedly non-fluoridated when I checked).

DO NOT use a plastic comb to brush out your hair when applying this aloe vera gel into your hair. Sometimes it will leave microscopic gel balls that can tangle the hair, so go easy when brushing your hair. This hair care process shouldn’t be rushed as I found out in my early trial and errors.

Recently, I’ve heard from many folks that strive to grow out their hair and keep it healthy advise to ditch the plastic hair brushes and combs completely, and if at all possible, do not wash your hair with city water unless you have a water purifier/ filtration system that can filter out heavy metals, contaminants and some traces of fluoride. Another hair care top: opt for boar hair bristle hair brushes/combs. And those are difficult to find unless they’re antique. I saw a ‘made in China’ boar hair shower brush at Big Lots a while back, but inset in the middle of it was a chunk of plastic as a faux loofah sponge. I’ll pass thank you very much even though I realize getting rid of all plastics out of my life is nearly impossible although little by little I am making snail pace strides to natural vegan materials as I can afford to do so.

When I need to brush my hair I use an itty bitty antique celluloid comb. The rest of the time I use my antique hair/ clothing brushes since they were made during the 1850’s/ 1900’s and have real hair bristles (not nylon even though it was produced back in this time frame). Since using the antique hair/ clothing brushes to brush my hair vs. using plastic hair brushes has made a huge difference. I haven’t dealt with many tangles when brushing my hair after it’s completely dry, that is. And I haven’t felt any knots or painful tangles in my hair either like I used to get often when using a plastic brush and comb. And I quit combing my hair while its still wet. This is when the hair is most fragile and elastic-like. It can snap, strands can fall out (often referred to hair fall out) when brushed wet, tangle and knot like it’s nobody’s business, and did I mention all of it painful if you have a sensitive scalp? It is.

Thanks for re-blogging, liking, commenting, sharing, tweeting and especially to all of my subscribers. I truly appreciate your likes, shares, etc.! 🙂

I’ll be posting some budget gourmet kitchen how-to goodies from how to grow your own celery on your kitchen window sill, drying your own spices from fresh store-bought/ patio-grown herbs, making cinnamon-flavored toothpicks, and my almost “sugar free” dessert. 😀


Collecting silverplate: The saga continues…

Published April 3, 2016 by AntiqueMystique1
silverplate brushes 4-1-16

Three antique silverplate brushes.


Everywhere I look there’s something else that catches my eye. How much silverplate is too much? To a collector that would be hard to define. I have come across (and paid high prices for), a few pieces of early tarnished (almost black), dented, dinged, and cracked silverplate and that was when I was a newbie to collecting and didn’t know any better. We all live and learn along the way. In fact, a few pieces were so bad off, they’d likely do better extracting whatever trace amounts of silver was left in them rather than hide them in some closet out of sight.


And during my time collecting silverplate I’ve also come across some mis-matched pieces, forlorn, and almost every piece silently begged to be re-purposed (as in using it for something else other than what it was meant for in some cases). Other times it just required a very good thorough soak in hot water, baking soda and placed in an aluminum roasting pan.


On the other hand do keep in mind the more delicate silverplate pieces like combs, brushes, and certain types of footed creamer and sugar pots mustn’t get too hot in a water/ baking soda bath. Why? Because some of the feet, pour spouts and handles were fused with lead back in the day. Lead, when subjected to high heat can melt, thus ruining that once stunning tea pot or water pitcher. Thankfully, I haven’t had any issues when soaking my silverplate to remove the years of tarnish, but just the same, I do keep a constant eye on it from start to finish when I clean it.


How to date silverplate:


If it is dark (almost black) this doesn’t mean the piece is tarnished, rather it has been oxidized over the years. Depending on how and when a particular piece of silverplate was designed (and what year), can be traced either by a maker’s mark, or by the age of the silverplate and the darkening of the silverplate (or absence thereof). And it doesn’t really mean that the silverplate lost all of its ‘silver plated’ finish. I found out if a piece of silverplate is dark and kind of heavy to the feel, it is an older piece (pre-1900s), for example. If it resembles tarnish and feels light weight, the particular piece might have been produced after the late 1800’s. It appears that some folks nowadays are extracting what silver they can from these precious antiques thus ruining them entirely.


Oh, and the issue of potential lead is another concern. However, if the silverplate is in tact and doesn’t have any scoring, gouges, scratches, chips or cracks, then it might be safe to use if it’s a sugar or creamer set, a salt and pepper shaker. Some collectors advise to promptly toss out the salt and pepper when done with a meal, and make sure the salt and pepper shakers are clean and allowed to dry completely after washing them out by hand. I wouldn’t recommend placing any silverplate item in a dishwasher. In fact, it amazes me that so many people don’t do dishes the old-fashioned way anymore: at the sink with some dish soap, a sparingly amount of bleach, and hot water.


I see folks commenting all the time when it comes to buying up old porcelain dishes, Transfer ware, antique Ball, Kerr, Quick-Seal, and Mason canning jars that have wire dome glass lids and the zinc porcelain-lined screw cap lids. Some canners still use the antique canning jars and just fit them with new lids and bands. I’ve also found that antique canning jars come in very handy for storing dry foods like beans, pasta, rice, flour, etc. I can’t vouch for the silverplate items as I’ve downsized yet again, only to buy some silverplate brushes likely from the 19th century or a little earlier. They might be hair brushes, or clothing brushes. I have one right now I’m in the process of shaking out some sediment. The celluloid overlay has come slightly detached from the silverplate handle, and thus it sounds like a maraca when shook and loose bits of black dust fall out. I suspect this might be coal dust, or something very similar. So it leads me to believe this brush had collected soot most possibly when homes were once heated by coal and wood as a primary heating source which in turn might date this particular brush back to the early 1900s or earlier.


The designs on the brushes are what catch my eye, and you just don’t see beauty like that anymore. When have I ever walked into a store, plucked a package of plastic brushes (or combs) and saw a breath-taking embossed image of a woman’s face, hair free-flowing and every nook, crevasse and cranny filled with a flower motifs? Nowhere in today’s times, and since I’m making great strides to downsize all the plastics out of my life (although I do realize plastics can’t be entirely avoided), I figured silverplate brushes, combs and other antiques will likely survive another 100 years.


I love silverplate, and since using a real bristle silverplate hair brush and versus the inferior plastic counterparts, my hair is thanking me for it. When I used plastic brushes (didn’t matter if was cheap or pricy), my hair would never fail to snap and tangles were painful to brush out, creating more frustration, painful tangles. There’s a different sensation to using a real bristled antique hair brush as opposed to using a plastic one. I even discovered that some of the celluloid hair brushes worked better than what’s mass-marketed today, and with a growing trend among health-conscious consumers, you’d think there’d be more choices than just plastic hair brushes and combs. I seen a real bamboo toothbrush made of wood. But the bristles were made by the DuPont company and sounded very much like a synthetic plastic just marketed under a new name. Oh, and the toothbrush was made in China from American parts and cost $6.


Well, looks like its plastic toothbrushes for the time being, and no, I would never, ever use an antique celluloid toothbrush. I only saw one surface many years ago in a matching set that had belonged to a family going back generations. The real boar bristles were very dirty, tanned, and the celluloid itself appeared very unclean, yellowed, and stained. Sometimes celluloid attracts stains like magnets. And here again, why brush with an antique that’s comprised of camphor and nitrate? That’s asking for it if you want my opinion and icky. Now I don’t mind sanitizing the celluloid hair brushes or even the combs, but the celluloid combs never worked great for me.


Now the silverplate brushes make good dry skin brushes since the bristles are already broken in in some cases, soft, and likely made out of real boar hair, or similar bristles and not plastic since that wasn’t invented until the 1930s.


A dry skin brush routine also helps the skin breathe, helps blood circulation and the body release a build up of toxins. When I read about the dry skin brush and it’s advantages in a recent 2015 freebie vitamin magazine, I remembered late natural path Bernarr McFadden promoted doing the same along with friction ‘baths’ as he termed them. A friction bath is taking a dry towel and rubbing it all over your body. It is similar to a dry skin brush which he does recommend as well. And I decided to put my antique silverplate hair brushes to good use. After all I had neglected them for the past two years or so, and found some more recently to add to my collection.


The dry skin brush works best with a shower/bath brush. But the advice given in the vitamin magazine urged to avoid plastic bristle brushes because not only are they rough on the skin, but also plastics might contain harmful BPA’s as well. At any rate, I’m sticking with my silverplate brushes. Hope you enjoyed my blog. As always thanks for reading, commenting, sharing, liking, tweeting, re-blogging. I truly appreciate it! 🙂


My three-step deodorant (how-to-make):

Published January 31, 2016 by AntiqueMystique1

This was pretty much trial and error when I began my mission to quit putting unnecessary chemicals into my body over three years ago. I researched, scoured, and tried many ‘all-natural’ health food store deodorants with less than impressive results. And it was only after the fact when I would arrive home and read all the ingredients of said deodorants.

How much money did I end up wasting? About $30 per month!!! For that price I could have very easily made my own deodorant and still have money left over.

So, I kicked all those mineral salt deodorants and Tom’s of Maine to the curb. I pitched out all cheap store-bought deodorant brands too, especially the kind that contain aluminum, which by the way, from what I’ve read extensively about, the body doesn’t NEED aluminum. Aluminum could be a cause of bone disorders, kidney problems, Alzheimer’s, breast cancer. Therefore, to eliminate these risks I looked through all of my daily beauty products. I was quite shocked to find Ivory soap “the soap that floats” does contain that sneaky beauty industry word, “fragrance”. This means Ivory isn’t 100 pure. Also, whether or not it really does as advertised to kill 99.9 % of germs leaves a lot to the imagination. If it’s a bar of Ivory it will collect bacteria like a Petrie dish.

Throughout the summer of 2015 I experimented using nothing more than a lemon slice daily. And believe me if you have sensitive skin this will burn like a three alarm fire! Lemon slices were out as far as home made deodorant alternatives were concerned in my case. I looked into using just baking soda, but found I had to re-apply it quite often and it sweated off in less than five minutes. Also, some generic and well-known brands of baking soda can contain aluminum which could account for me breaking out into rashes and having it make my teeth hurt when I used to brush with it in place of store-bought toothpaste.

Well, gosh darn it! So I did further research and came across some home made deodorants using Arrowroot Powder, but the stuff’s expensive. For the meantime, I just wanted a ‘go-to’ home made deodorant. While I was reading up on the benefits of raw organic coconut oil (like oiling pulling where you swoosh a spoonful of coconut oil in your mouth the very first thing 20 minutes upon getting up and on an empty stomach). Not only is this anceint techinque suppose to help draw out toxins, it’s also supposed to help your oral health and whiten teeth as well. I also read about coconut oil’s deodorant properties too. I then discovered there’s many more uses for hydrogen peroxide other than just using it to treat cuts and scrapes. Hydrogen peroxide also has deodorant qualities. I tried this and almost got it to where it worked for me, but it wouldn’t stick. Hmmm…

For the final test version I dusted off with Rumford aluminum-free baking powder. The results? Excellent!

Here’s my three step process I’d like to share with the readers. If you like, you’re more than welcome to pass this along. I don’t know how well this will work for every individual since everyone is different, but here it goes:

Wash, shave (if you need to), and pat dry your underarms. I do this exclusively as part of my morning routine. I haven’t even begun to master tweezing and don’t ever foresee myself getting the hang of that. Shaving is still very quick for me and less of a hassle.

After your underarms are dry, smear some raw organic coconut oil on your fingers and apply this to the underarms making sure to get a generous amount rubbed into the skin.

Next, soak a piece of toilet paper with Hydrogen peroxide and dab this to the under arm area. Since I haven’t found an easier solution to apply hydrogen peroxide without a piece of toilet paper, this will have to do for now. I’ve tried using cotton balls to no avail and even tried using a facial scrubbing pad with messy results since the hydrogen peroxide doesn’t absorb into either material. It just dribbles all over the place.

And last, using a big makeup brush (or powder/ blush brush), dip it into the Rumford’s aluminum-free baking powder and dust it under the arms. Depending on whether or not you’ve shaved recently this might make sensitive skin hurt and/ or turn red. The redness goes away as long as there’s no razor burn or scrapes. And the sensitivity might lessen. Don’t apply this to broken or irritated skin, nor rub in the coconut oil with sharp fingernails. Believe me, this hurts really bad!

Things you’ll need:

Two makeup blush/ powder brushes. Since I use just one for now I often have to wash it out every other day to prevent bacteria buildup. Having two would come in handy while one is drying.

Hydrogen Peroxide (any brand) although I’ve heard there’s a lot of difference between brands.

Rumford brand aluminum-free baking powder (this can be found in most health food sections of a grocery store and/ or health food vitamin store). The container comes in a red can with a tan-color plastic lid. This baking powder sells between $2-3 dollars depending on location.

Raw Organic Coconut oil. I personally haven’t noticed a difference between cold pressed virgin coconut oil or any other less expensive store bought brand. I use whatever coconut oil I have on hand. I used to buy coconut oil by a brand called Spectrum, however, my store quit carrying it. It was also great for baking too.

And there you have it. I hope this is helpful for everybody. I also did this as to get away from the name brand/ store bought deodorants that have been known to be linked to certain types of cancers. And especially for women since some commercial deodorants have been linked to lumps in the breast tissue and lymph glands under the arms as well. By cutting out the use of deodorants exclusively, it’s my belief that my body is thanking for doing it.

And one other thing before I close: what you eat and put into your body has a lot to do with how your body sweats out the toxins and the odors that it’ll release. For example, if you eat a diet rich in red sweet onions, white onions, garlic, then you’re body will secrete these causing body odor that’s very unpleasant. However, I’ve heard from others who are on raw veggies/ fruit diets say that the body odor is almost eliminated and it all boils down to one’s own chemistry, sweat glands, etc. As always, thanks for liking, re-blogging, sharing, commenting, tweeting. I sincerely appreciate it. 🙂

Naturally ‘deceptive’ and Thai Aluminum—err “mineral” salts: What’s really in deodorants:

Published June 13, 2015 by AntiqueMystique1

It came as no surprise when I read about all these organic, healthy, natural deodorants sharing suspicious possibly even toxic ingredients with their commercial counterparts. Ever since 2004, when I first became wise to the nasty toxins and other hidden toxins disguised in most deodorants that have been linked to Alzheimer’s disease and certain kinds of cancers, especially breast cancer in women, I began to take a very serious look at what I had up to that point been using daily for many, many years.

I tried everything as an alternative deodorant from a fresh sliced lemon which caused me a three alarm fire to using just plain baking soda which caused me to have very sore underarms. However, neither of these do-it-yourself, ‘save money’ home remedies for deodorants worked for me.

Sure, they can be inexpensive and that was it. The baking soda dusted on with a powder puff applicator worked okay, but only at first for fifteen minutes. However, I found I constantly needed to re-apply it because it sweated off rather fast and didn’t last. Plus it caused my underarms to become increasingly painful and made them feel raw. Therefore, I had to go straight back to the store bought deodorants and continue to subject myself to more toxins for several more years.

I checked into Tom’s of Maine, Thai mineral salt [aluminum] deodorant, and any other supposedly ‘healthy’ deodorants only to find out none of them are even remotely healthy in the least. For myself I discovered that whatever other ingredients were in these made me burn for an hour after application and one caused a serious nasty looking rash as well. Most of these healthy deodorants contain two cleverly disguised beauty words passing themselves off as an organic and/ or safe and it is propylene glycerol and ‘mineral salts’.

What is propylene glycerol exactly? It is an organic compound with the chemical formula C3, H8 O2. It’s a colorless and odorless liquid that has a faint sweet taste to it.

Sounds like its kissing cousins with automotive antifreeze and that’s what it is. Propylene glycerol is in inexpensive Imitation Vanilla Extract, dog food, regular food and most deodorants even in the ‘natural’ varieties as well. Natural paths will claim to avoid this ingredient or at least to find alternatives to make your own deodorant at home using Arrow Root powder, Shea butter, organic bee’s wax pellets, scented essential oils (make sure you look for the kind that can be applied safely to the skin), baking soda, and here again, they strongly advise NOT to use just any inexpensive baking soda. Some baking soda has been known to contain aluminum even though its not listed on any of the cheap boxes I have in my cupboards. One baking soda company that claims not to have aluminum in it is Bob’s Red Mill baking soda. Personally, I haven’t had the chance to try this out, but do plan to eventually. Since I absolutely dread driving to get to my vitamin store again I will likely order these ingredients online.

The bad draw back of the only vitamin store in my town is that it also shares parking lot space to an extremely busy snow cone drive-thru (yep, snow cones are a hot commodity nowadays). And people pulling in behind you will blame everything on you that you’re the sole reason your blocking a place of business when there’s also an insane long line of cars waiting to go through the drive-thru and there’s no margin of space to pull into the vitamin shop (bad city design layout). Well, whoever thought up the brilliant idea to open a snow cone/ shaved ice drive-thru smack dab in the middle of a busy two-lane street is likely laughing all the way to the bank without a care how their business impedes the folks that need to go to the only vitamin store. It’s beyond frustrating, especially in the summer.

I also dread the inflated prices of my vitamin store too which is why I seldom, if ever stepped foot inside there until at the beginning of the month when I thought I was going to be a little healthier for wasting $8 on a stick of Thai mineral salt deodorant which actually contains heaping portions of aluminum. Our bodies don’t need aluminum or ‘alum’ for short, or even potassium salt which is the same thing. So folks, please, if you don’t do your homework, then I will do it for you. 🙂

I was at my wits end a couple of nights ago. I noticed rashes forming after using the “natural” deodorant “Naturally deceptive” err… I mean, Naturally Fresh. Not only does this contain aluminum, it also contains Xanthan gum. What’s this new ingredient? I think to myself after buying a pack of peppermint chewing gum containing this Xanthan. I was told at the health food store in Colorado where I previously lived that it was a natural sugar…. eh, what lies people will tell. Xanthan derives it’s name from a strain of bacteria Xanthomonas campestris and it was discovered in the 1960s and used in cosmetics to prevent separation and added as a thickener in foods and salad dressings… eeeww, gross. I am so kicking Hidden Valley Ranch to the curb.

And since I’ve quit consuming sugar (as much as humanly possible), I no longer chew gum anyway. And I certainly will look for alternatives for making my own cosmetics and toiletries. I’ve already downsized my perfumes and store bought lotions because they contain “fragrance” and ‘perfume’, in the beauty industry this allows companies to put any nasty chemical in their product and they don’t have to list it.

Now some toiletries I will admit do smell nice, but are the potential health risks worth it in the long run? I can do without, thanks very much. I will see how much I can save by teaching myself how to make some of them at home using natural food-based ingredients. And here’s the versatile use I found for Organic Coconut oil:

1.) I tested it as a deodorant going on three days now in extreme heat. It works. Not only is coconut oil great for baking and cooking, it has anti-bacterial properties that can help eliminate odor when mixed with a little corn starch and/ or aluminum free baking soda.

2.) Organic Coconut oil makes an okay toothpaste. The downside is I’m mixing this with inexpensive baking soda that may contain aluminum so I’ll have to omit this from my toothpaste and switch to using salt and coconut oil instead in a pinch.

3.) Organic Coconut oil is used for home made lip balm. Since I don’t have the ingredients or even the essential oils to try this out as of yet, I can’t vouch for how well it works. I would imagine better than store bought chap sticks that can dry out your lips. Also, steer clear of that chemical “camphor”. Not only was camphor a main ingredient used in the production of celluloid items, but it was also a known chemical used in the production of Edison 4 minute blue Amberol cylinder records way back when.

Organic Coconut oil might be my newest friend and life saver, literally! Since using it in combination with some soothing vitamin E oil which can be found in Dollar General for $2 or even at Family Dollar, but be warned, some vitamin E oil can contain soybean and olive oils to keep cost down. So far I haven’t ran across any that contain the synthetic “DL” in the vitamin E oils, but I’m sure that’s coming. For now, I’ve had no problems using vitamin E oil and use it to soften my skin after I shave my legs. And it does sooth sore underarms and razor burn too. A little bit goes a long way.

Also, I haven’t noticed any of these aforementioned oils ruining my whites. I wear a lot of light-colored shirts in the summer to deflect heat as much as possible. And when I bake in that oven of a vehicle, the organic coconut oil and vitamin E oil are put to the ultimate test of endurance and I rate them an 11 +++ on a scale of 1-10 (10 and beyond being the best, 1 being the worst).

So there you have it, also stay tuned for another hair beauty blog that has amazing benefits that will strengthen and keep your natural hair color. As always, thanks for reading, re-blogging, sharing, liking, tweeting, etc. I always appreciate it and your comments as well. 🙂